

Questflow has upgraded its account and wallet infrastructure to provide a more secure, flexible, and user-controlled experience.
You can still sign in or create an account using the methods you are already familiar with, including your existing wallet or email.
What has changed is how your assets are controlled and managed after you sign in.
With the new Questflow wallet system, the assets you hold and trade are associated with wallets under your control. You can move and manage your assets whenever you need to, while continuing to use Questflow for trading and AI-powered financial workflows.
If you already use wallets such as MetaMask, OKX Wallet, Coinbase Wallet, or other compatible wallets, the new system should feel much more familiar.
In other words, the new Questflow account system is designed around a non-custodial architecture, giving users greater control over their wallet credentials and assets.
The previous Questflow infrastructure relied on a Coinbase CDP-based wallet architecture. As part of the platform upgrade, we are moving to a new wallet system in which users have more direct control over their accounts.
For users of the previous Questflow platform, this requires a one-time migration.
This guide explains the full process.
Before You Start: Understand the Migration
If you previously used an earlier version of Questflow, signing in to the new platform will create a new Questflow account and wallet environment for you.
Your previous wallet does not simply disappear.
Instead, Questflow provides a recovery process that allows you to:
Recover the private key associated with your previous Questflow wallet.
Securely save that private key of previous wallet.
Import the previous wallet into a wallet application you control, such as MetaMask or OKX Wallet.
Confirm the assets held by your previous wallet.
Transfer those assets from the previous wallet to your new Questflow wallet address.
Activate trading permissions for your new Questflow account.
The most important part of this process is recovering and securely storing the private key of your previous wallet.
Please read the following section carefully before proceeding.
Critical Security Notice: Protect Your Private Key
Your private key controls the wallet associated with your previous Questflow account.
Anyone who obtains this private key may be able to control the assets in that wallet.
During the migration process, the private key for your previous wallet will be displayed to you so that you can take control of the wallet yourself.
This private key may only be displayed once.
Questflow does not retain control of the wallet after the key has been provided to you and cannot recover the private key on your behalf if you lose it.
For this reason:
Do not continue with the migration until you have securely saved the private key and confirmed that you can access the previous wallet using it.
We strongly recommend that you:
Copy the private key carefully and verify that the complete key has been saved.
Import it into a trusted wallet application such as MetaMask or OKX Wallet.
Keep an additional secure offline backup.
Store backups in an encrypted password manager, encrypted file, or another secure offline storage method.
If using removable storage such as a USB drive, use encrypted storage rather than keeping the key in an unprotected plain-text file.
Never:
Send your private key to another person.
Share it with Questflow support or anyone claiming to represent Questflow.
Enter it into websites you do not fully trust.
Send it through email, Telegram, Discord, X, Slack, or other messaging applications.
Store it in an unencrypted cloud document.
Upload screenshots containing your private key.
Post it anywhere online.
Questflow will never ask you to send us your private key.
If another person obtains your private key, they may be able to transfer the assets associated with that wallet without your permission.
Treat it with the same level of care you would give the password and signing authority to your financial account.
Step 1: Sign In to the New Questflow
Go to: https://next.questflow.ai
Sign in using the same method you used with your previous Questflow account.
This may be:
Your email account, or
Your connected wallet.
After signing in, follow the onboarding instructions presented by Questflow.
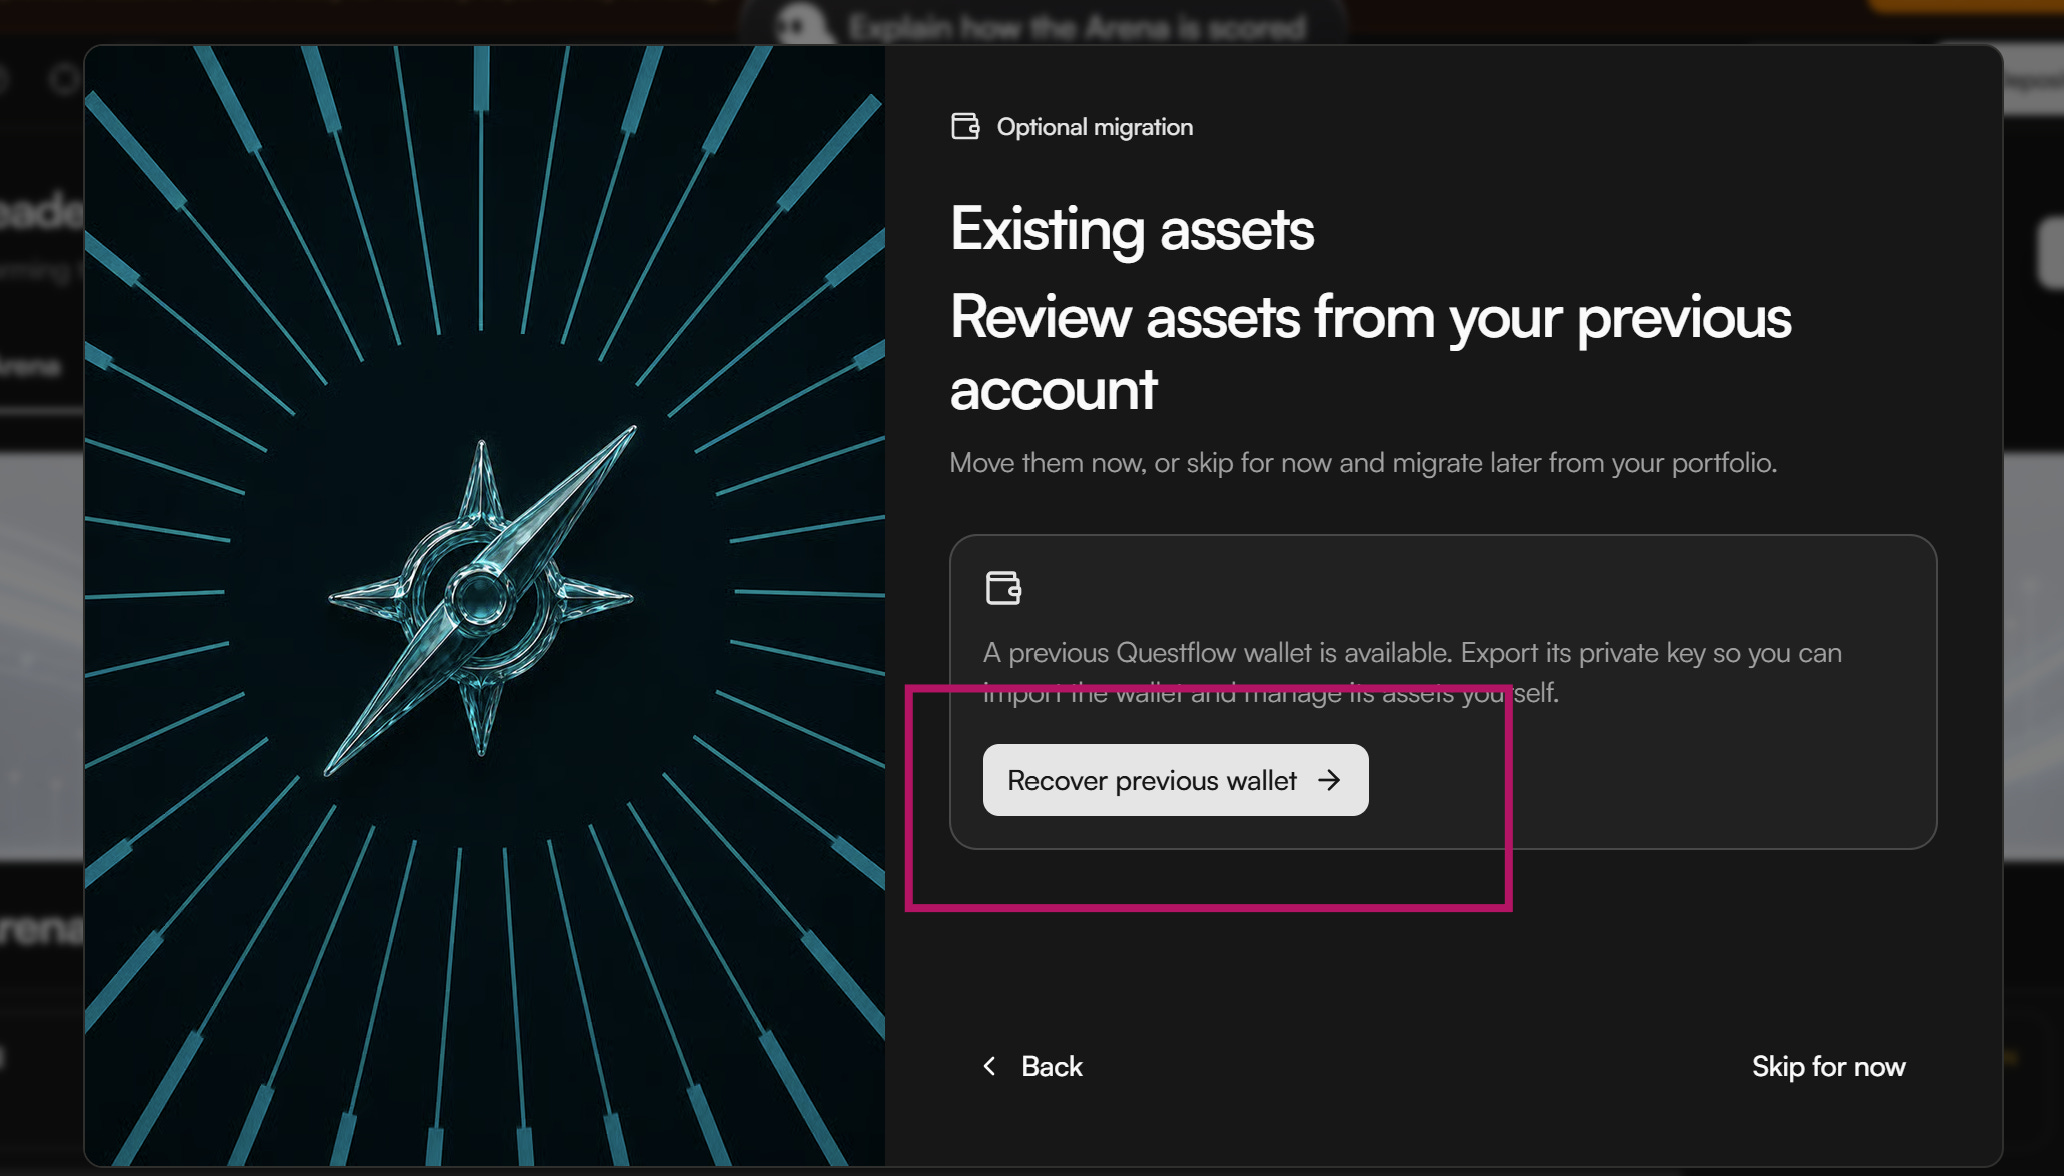
If you see the option:
“Recover previous wallet”
select it to begin the migration process.
If the option does not appear immediately, refresh the page once and check again.
Step 2: Export Your Previous Wallet Private Key
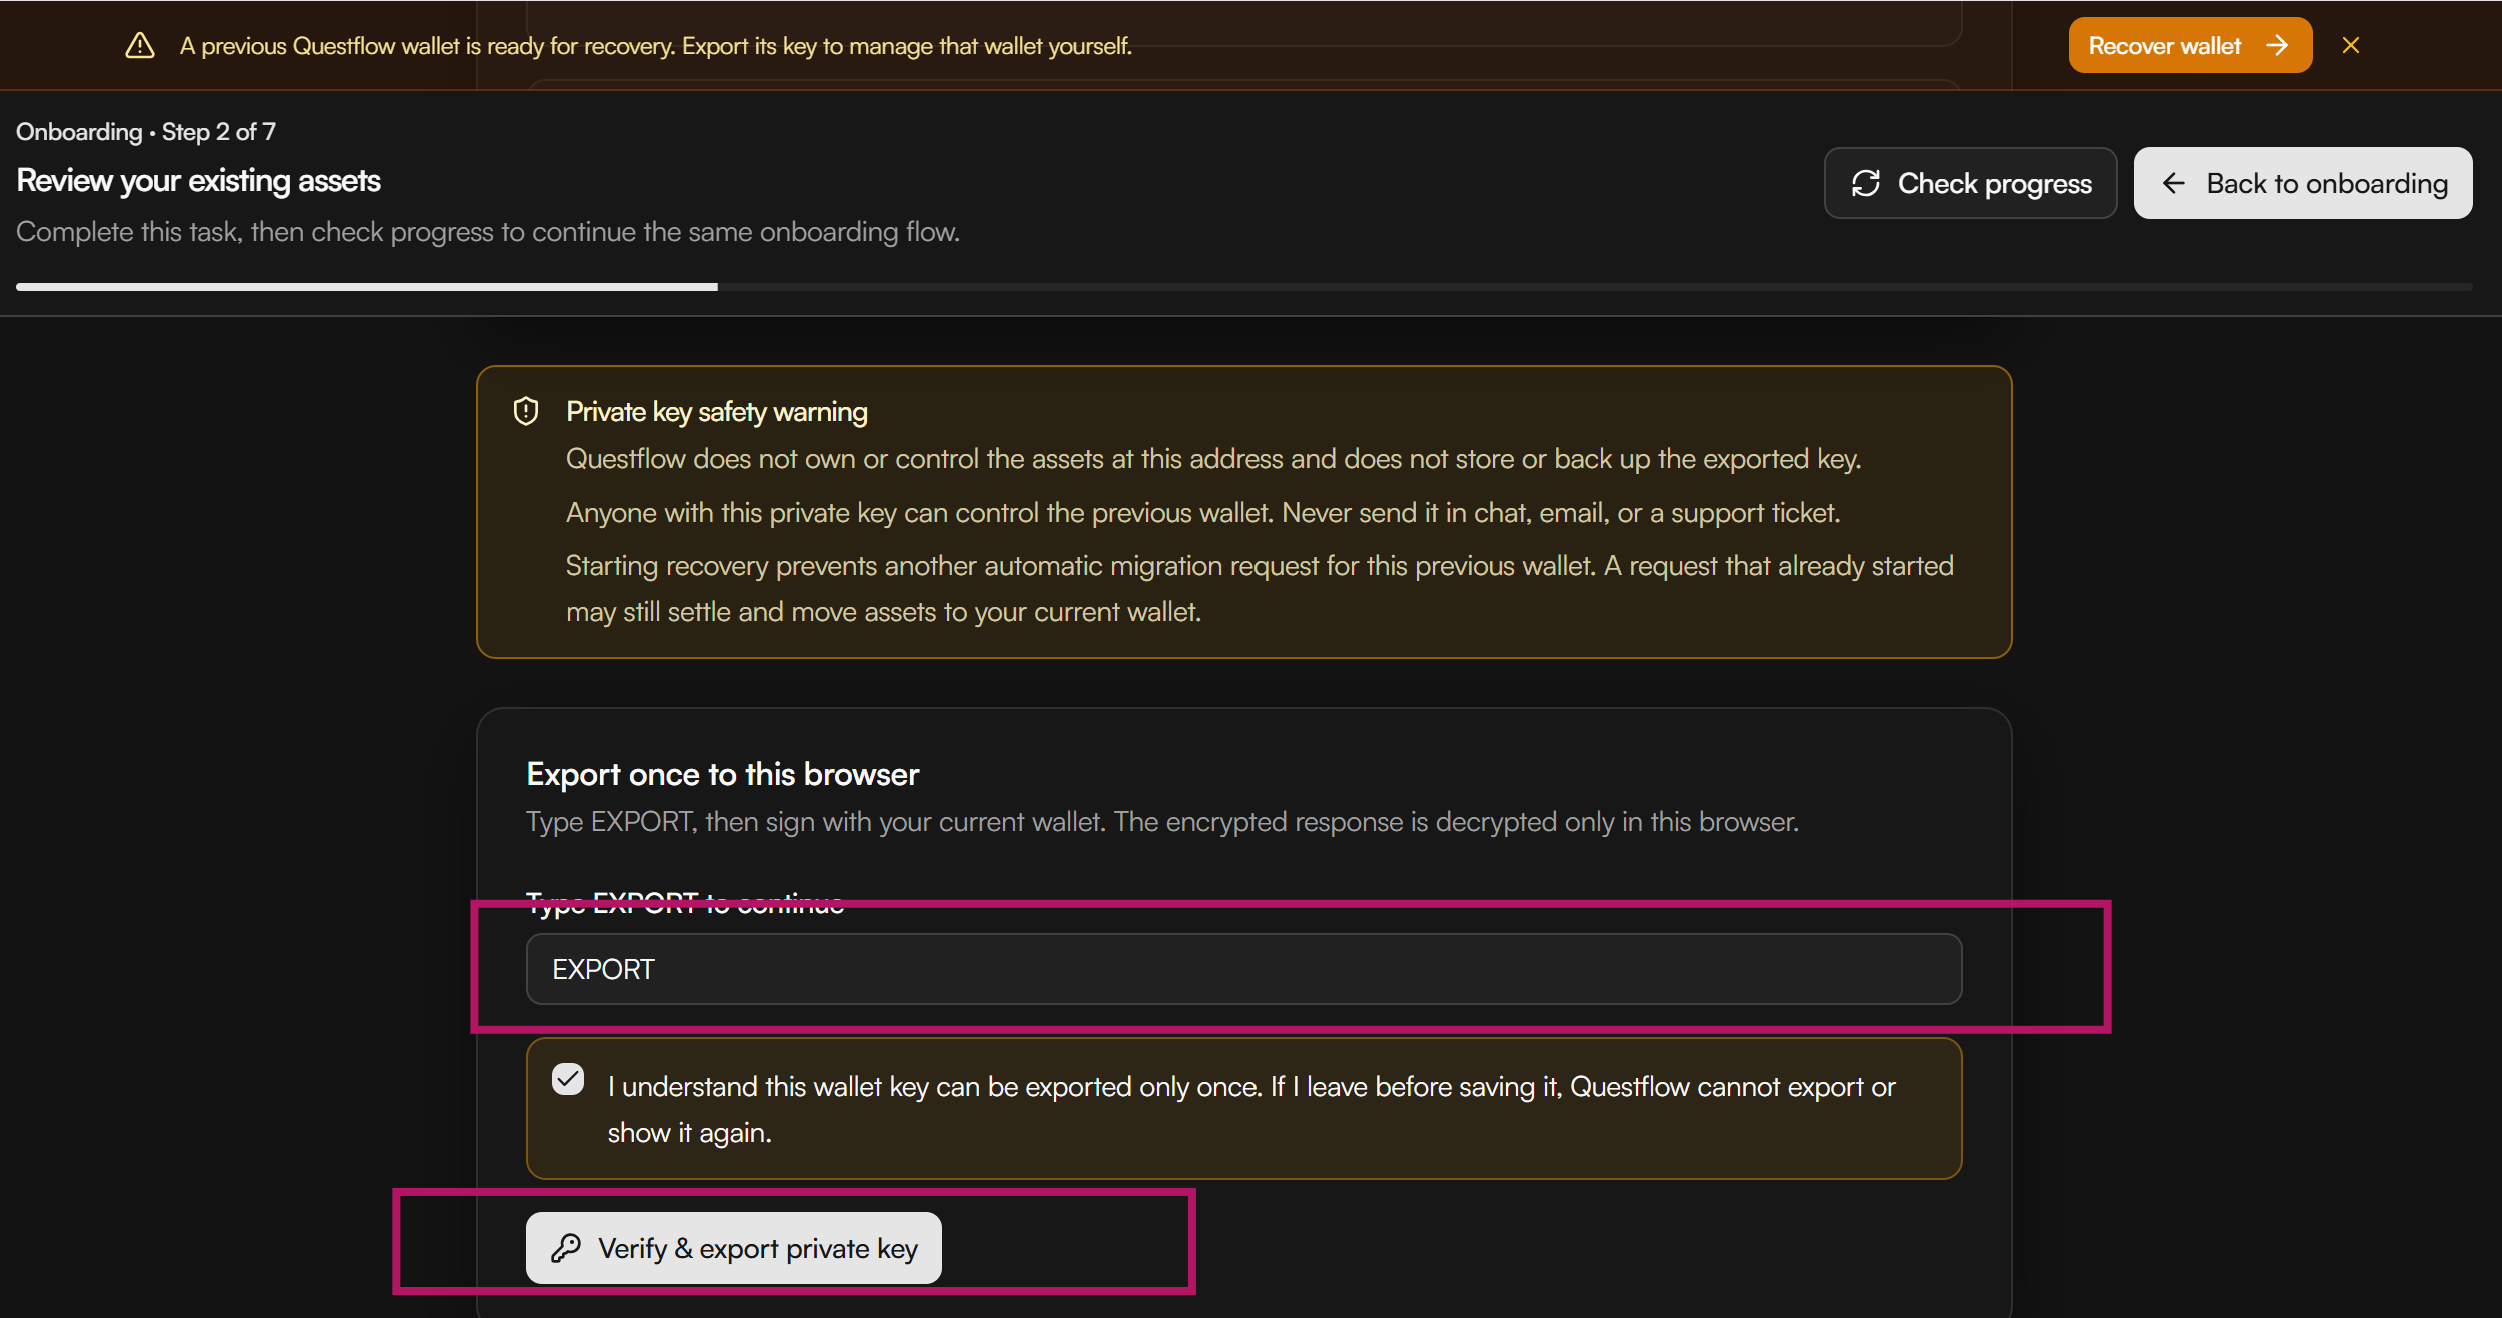
After entering the wallet recovery flow, you will see an important recovery page.
Please read every instruction on this page carefully.
This step gives you access to the private key associated with your previous Questflow wallet.
In the confirmation field, enter:
EXPORT
Then select:
Verify & Export Private Key
Questflow will then display the private key for your previous wallet.
Step 3: Save Your Private Key Before Doing Anything Else
This is the most important step in the entire migration process.
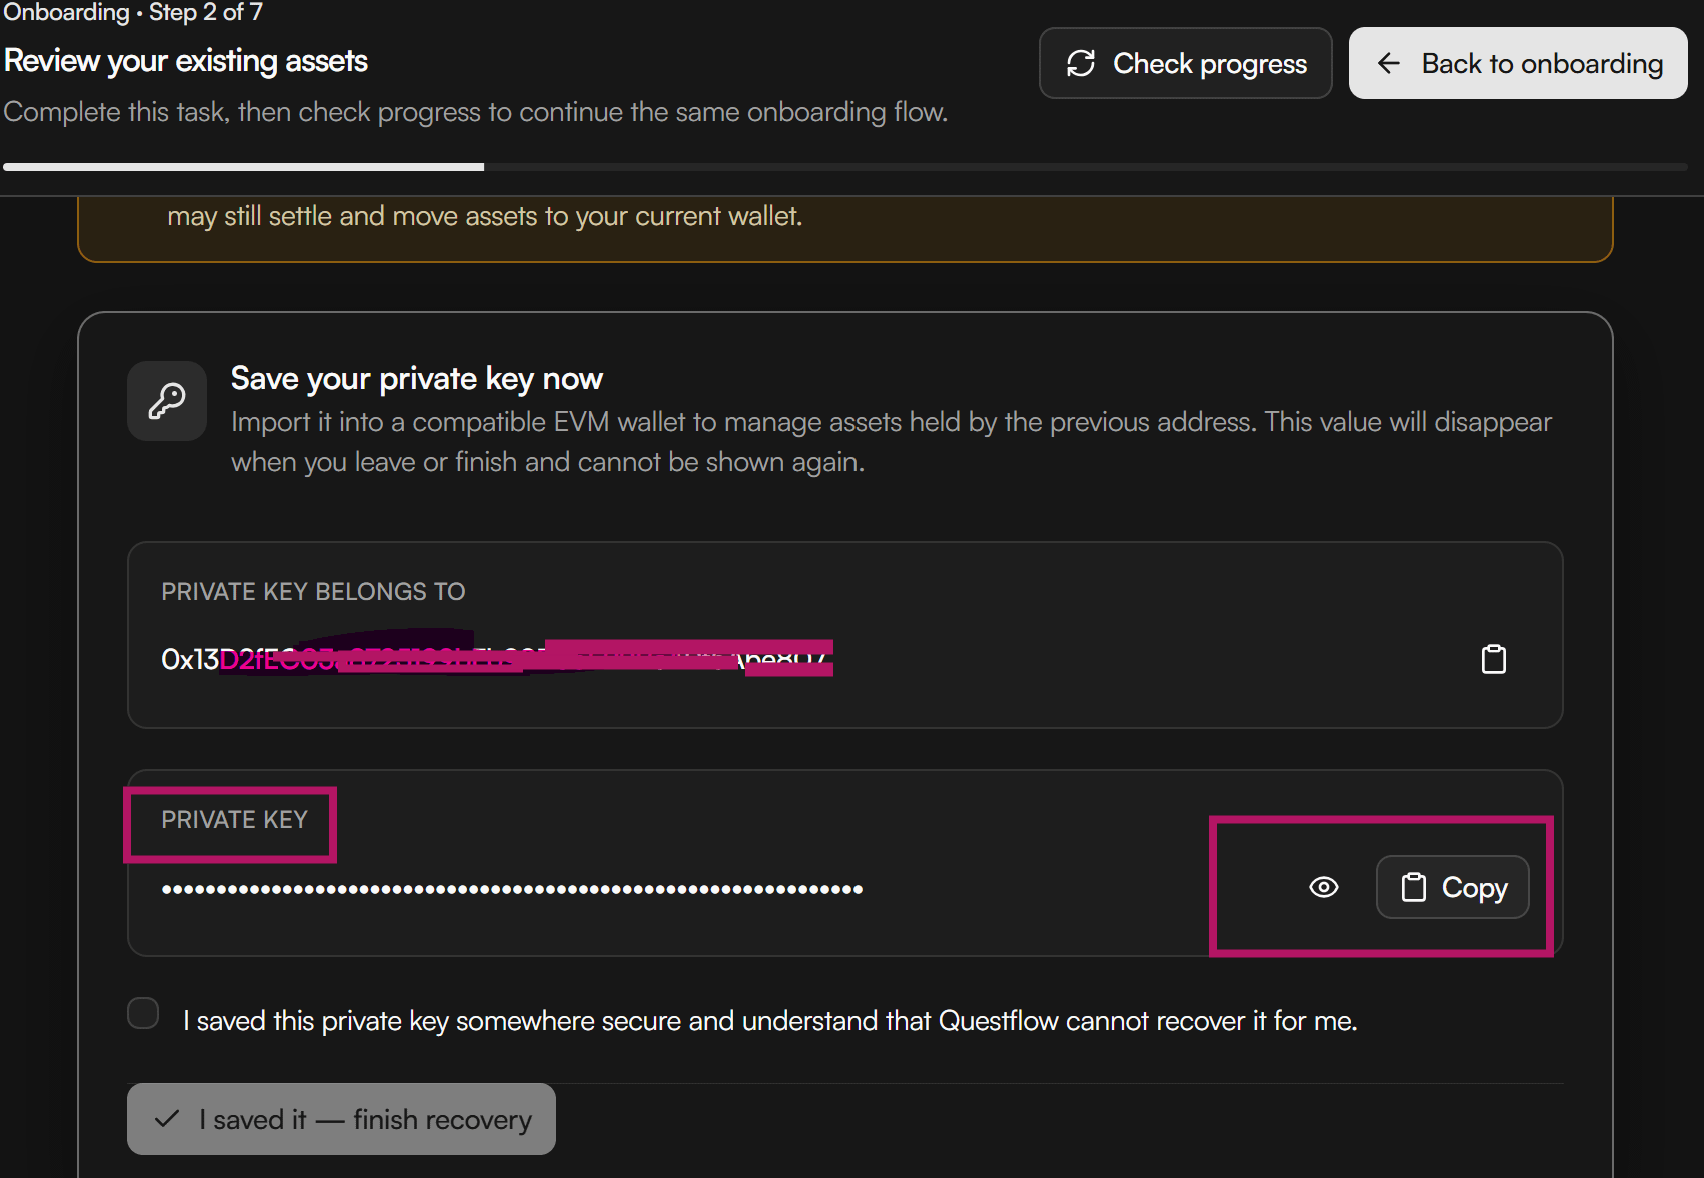
When the private key appears, copy it immediately and save it somewhere secure.
Do not close the page until you have completed this step.
We strongly recommend doing two things before continuing:
First, securely back up the private key.
Use a secure password manager, encrypted local file, or encrypted offline storage.
Second, import the private key into a wallet application you control.
For example:
MetaMask
OKX Wallet
Another compatible self-custodial wallet
After importing the key, confirm that the wallet address shown by your wallet application matches the previous wallet address displayed by Questflow.
Only after you have successfully imported the private key and confirmed access to the wallet should you continue.
Important
The private key may only be displayed once during the recovery process.
If you lose it and no longer have access to the previous wallet, Questflow may not be able to recover that wallet or its assets for you.
Do not click “I saved it — finish recovery” until you are certain that the private key has been securely saved and successfully imported into your wallet.
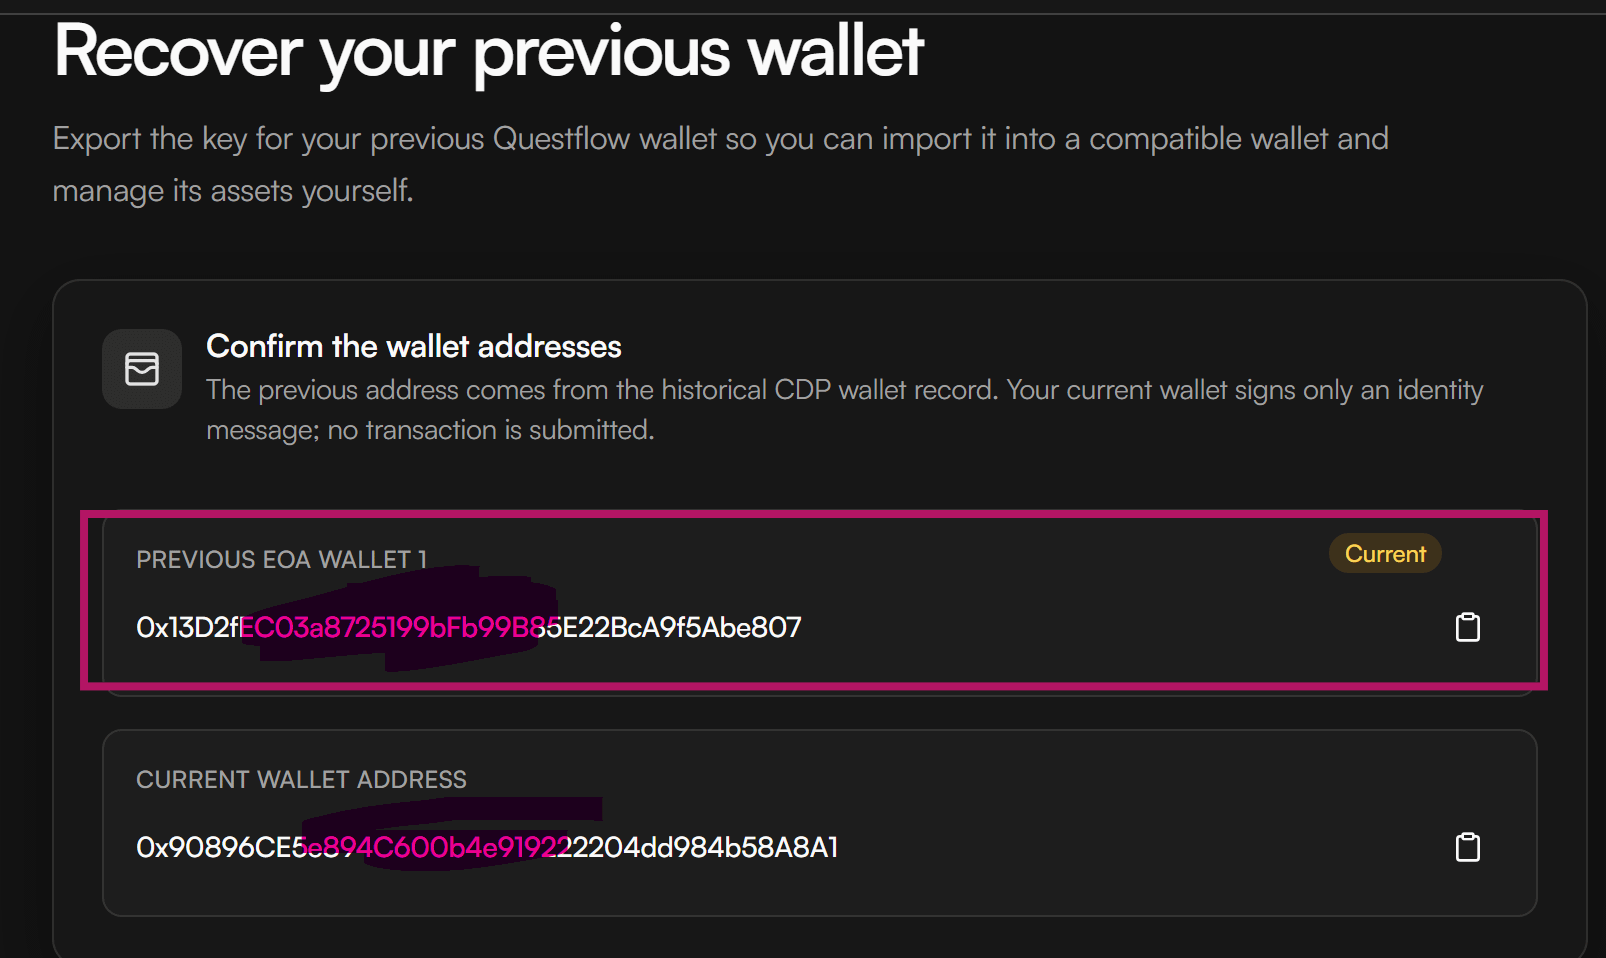
Step 4: Save Both Wallet Addresses
On the same recovery page, Questflow will also display two important addresses:
Previous Wallet Address
and
Current Wallet Address
Save both addresses.
They serve different purposes.
Previous Wallet Address
This is the wallet associated with your previous Questflow account.
The private key you just exported corresponds to this address.
You can use the address to verify which assets are currently held by your previous wallet.
Current Wallet Address
This is the wallet address associated with your new Questflow account.
You will use this address as the destination when transferring assets from your previous wallet.
Before making any transfer, carefully compare the destination address with the Current Wallet Address displayed in Questflow.
Crypto transfers are generally irreversible.
Always verify the full destination address before signing a transaction.
Step 5: Verify the Assets in Your Previous Wallet
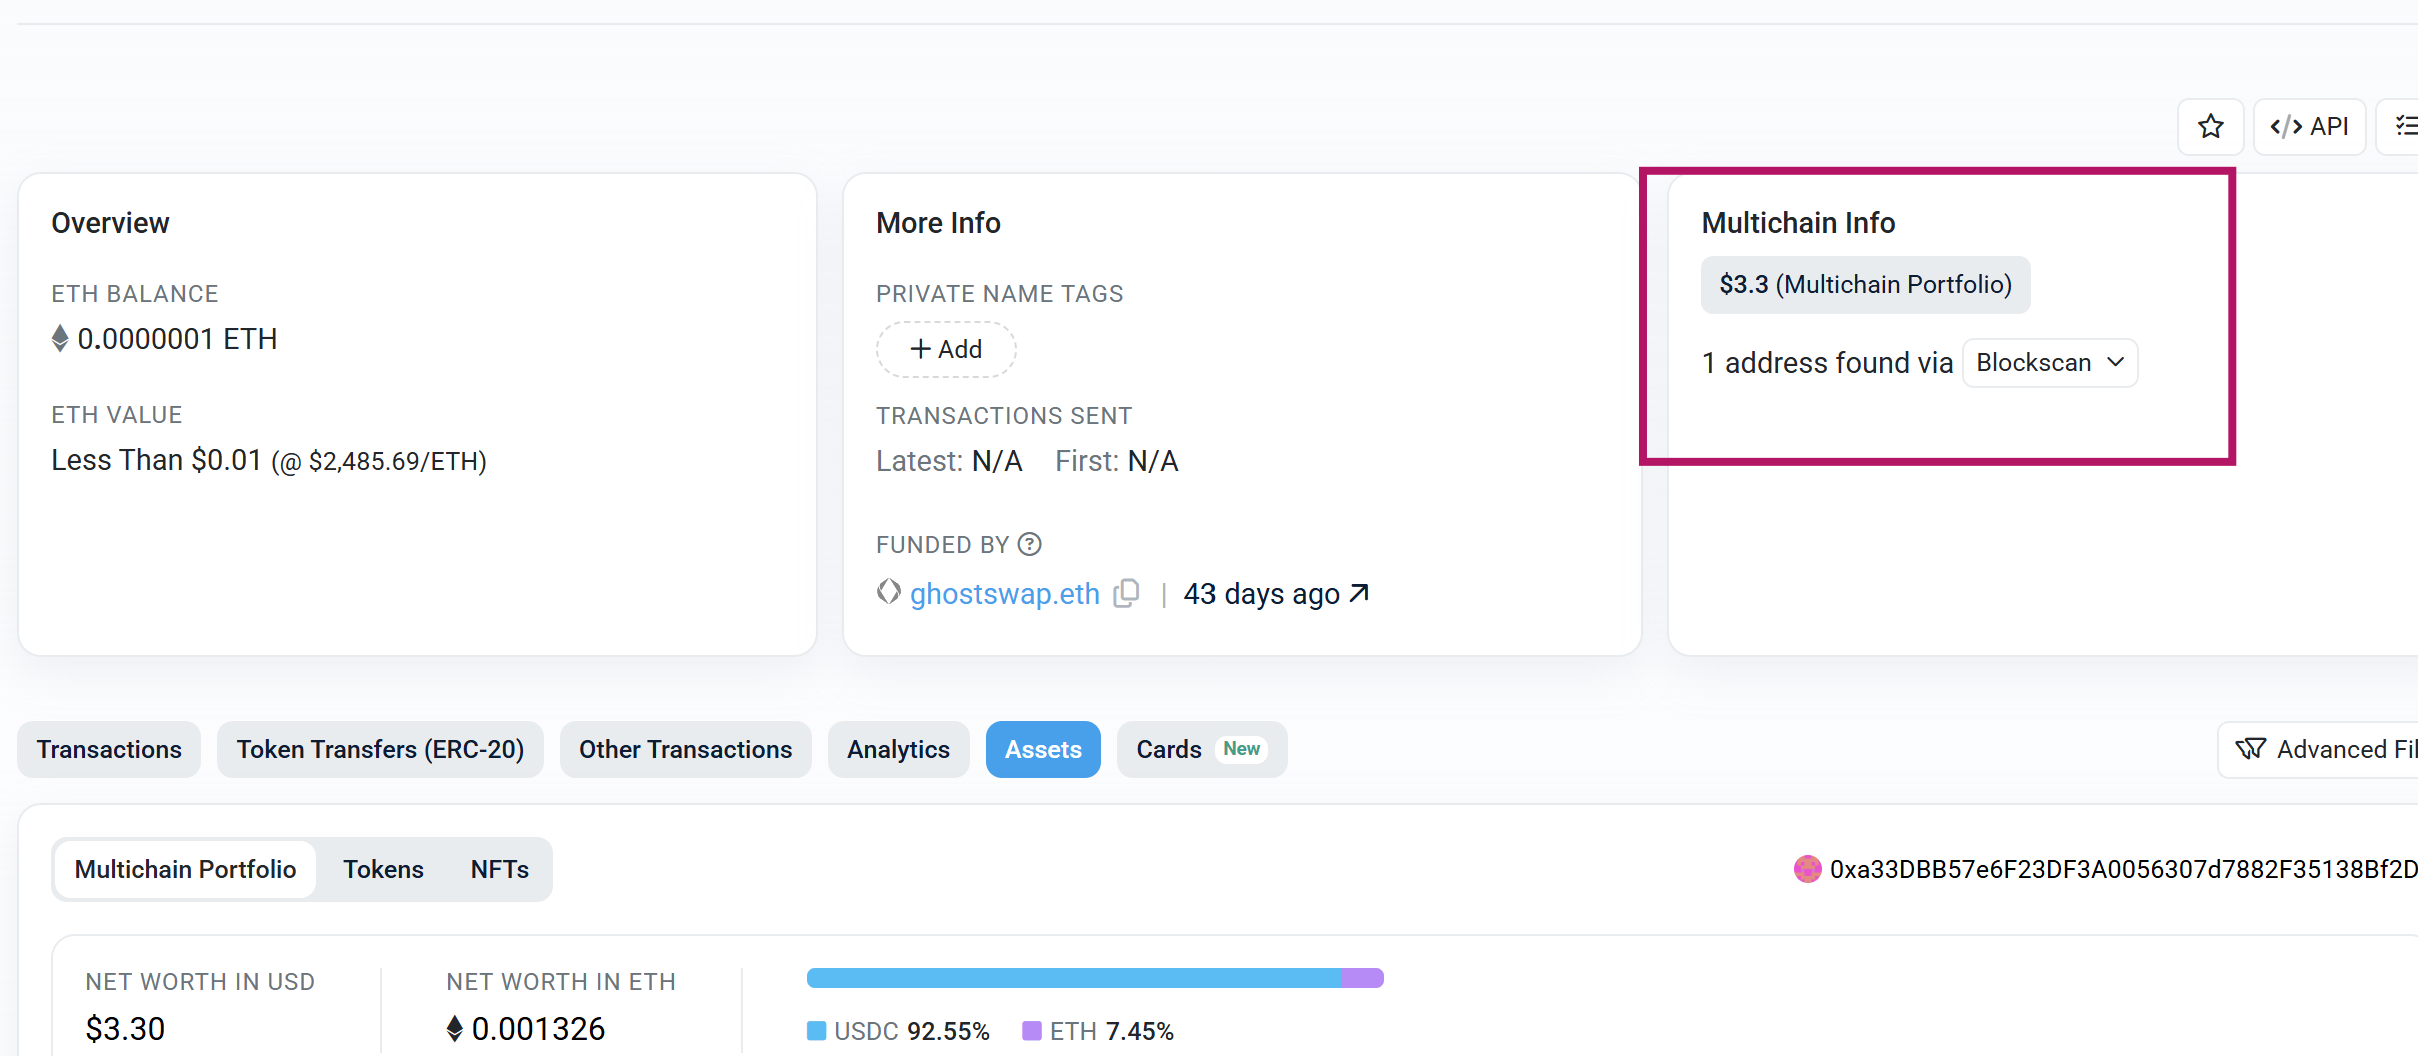
Once you have imported the private key into MetaMask, OKX Wallet, or another compatible wallet, you can verify the assets associated with your previous address.
For assets on Arbitrum, you can use the official Arbiscan explorer:
Enter your Previous Wallet Address into the search field.
You should be able to review the assets and transaction history associated with that address.
This provides an additional verification step before you begin moving funds.
At this stage, confirm all three of the following:
You have securely backed up the private key.
You have successfully imported the previous wallet into a wallet application you control.
You can confirm the expected wallet address and assets.
If all three are complete, return to Questflow and select:
“I saved it — finish recovery.”
If any of these steps are incomplete, do not continue yet.
Step 6: Transfer Assets to Your New Questflow Wallet
Once your previous wallet has been recovered and secured, you can move its assets into your new Questflow account.
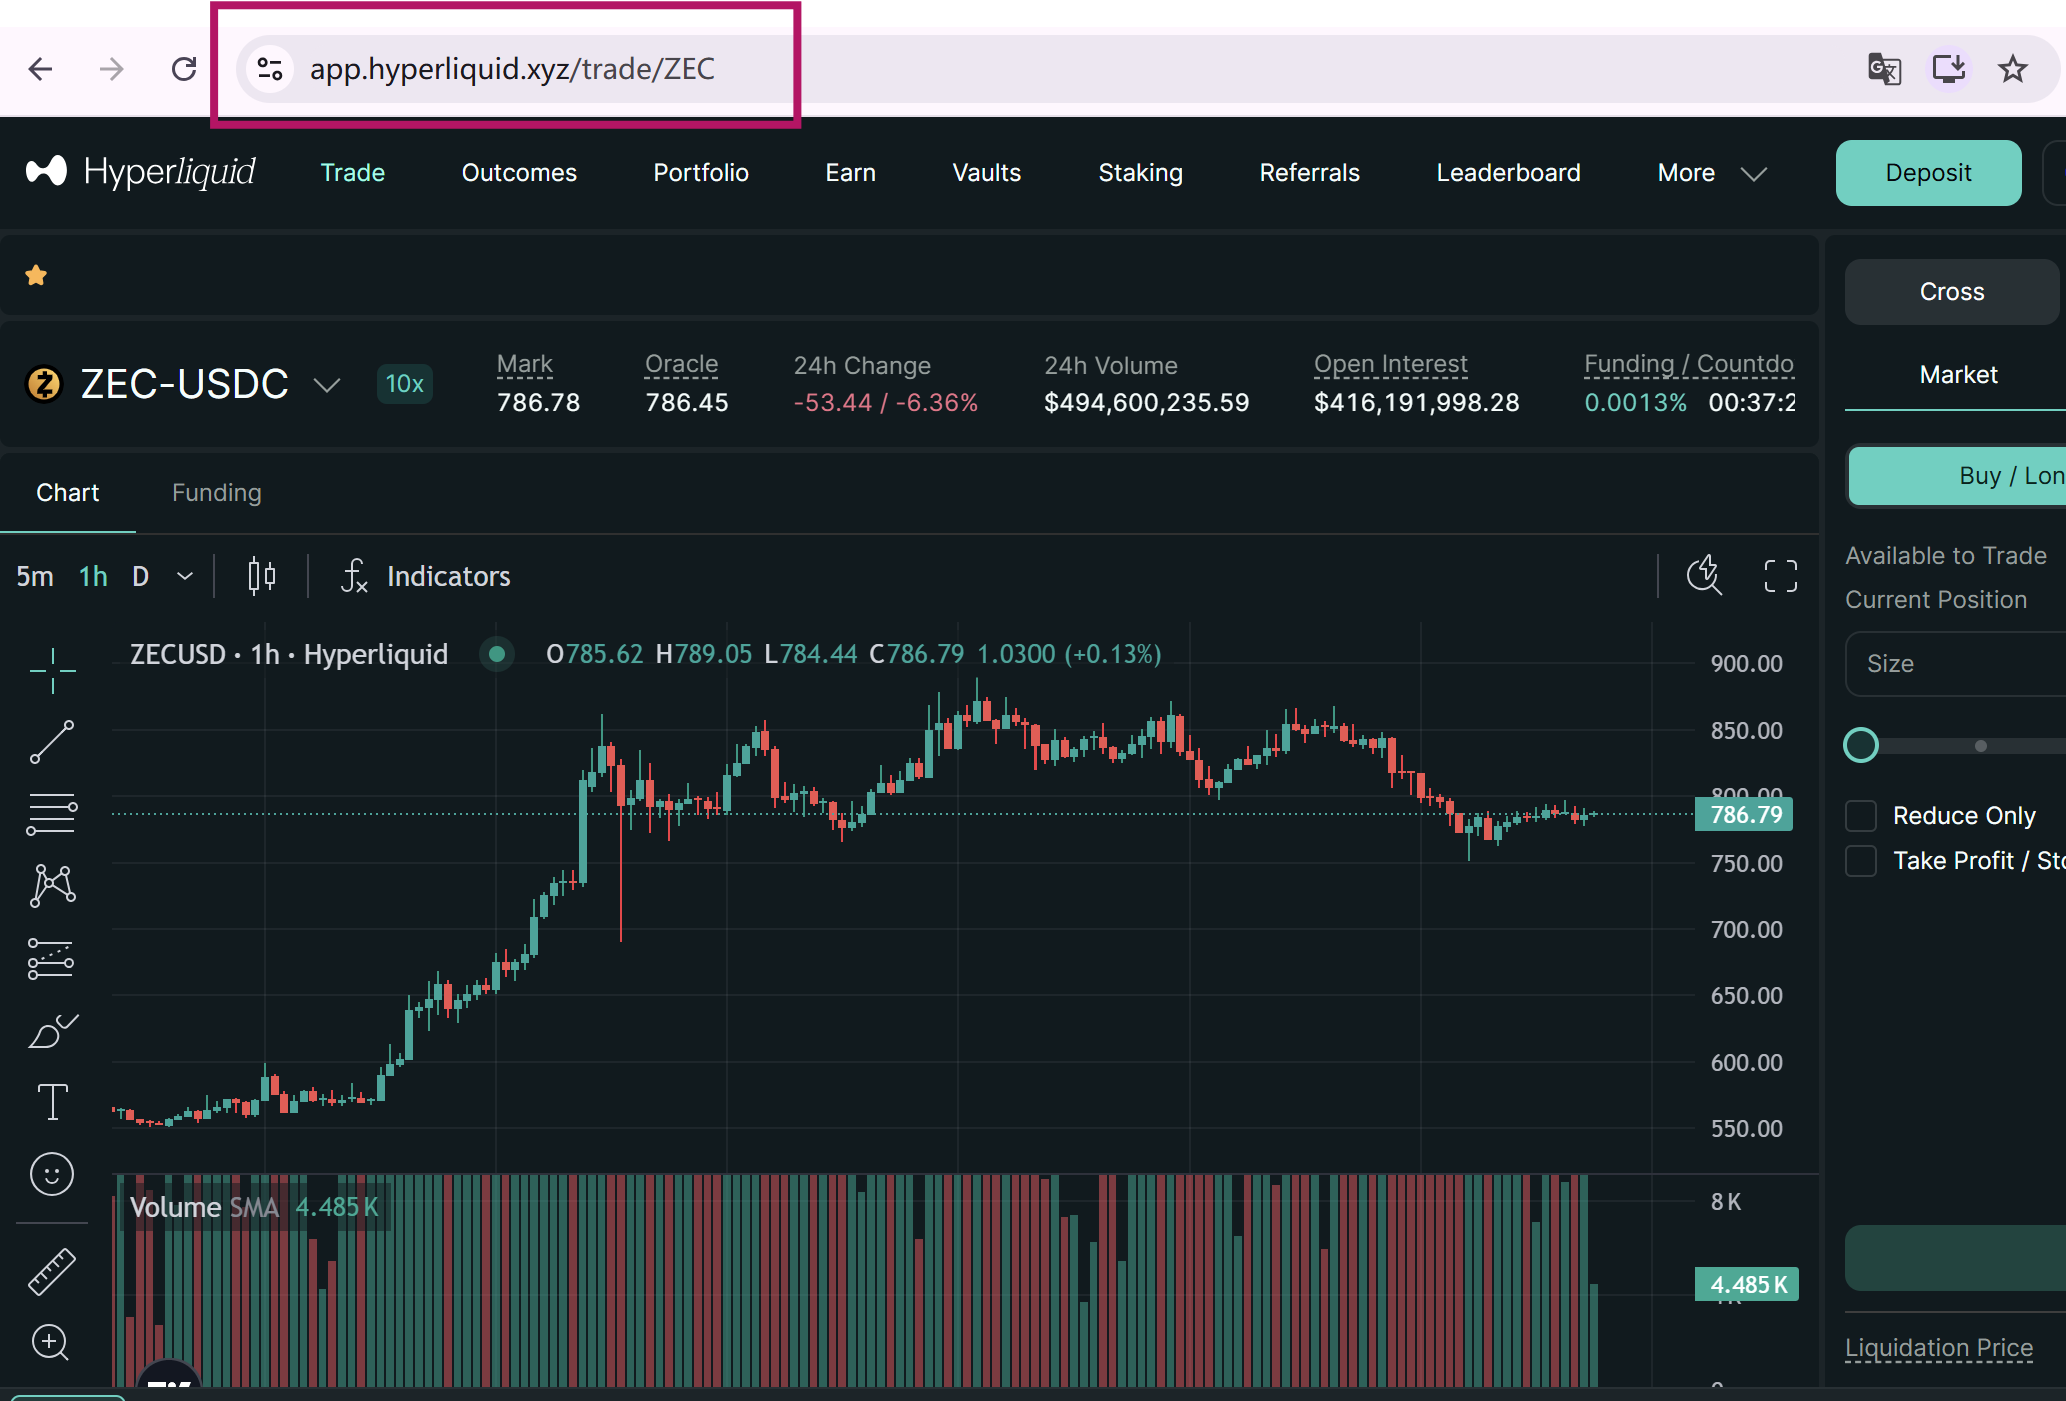
For assets held within the Hyperliquid environment, one straightforward way to complete the transfer is through the official Hyperliquid application:
Security warning
Crypto users are frequently targeted by phishing websites that imitate legitimate exchanges and wallet applications.
Do not connect your wallet through links received from unknown messages, advertisements, search-engine promotions, Telegram accounts, Discord messages, or unsolicited support messages.
When in doubt, manually enter the official address into your browser.
Step 7: Connect Your Previous Wallet to Hyperliquid
Open the official Hyperliquid application.
Connect the wallet into which you imported your previous Questflow private key.
Depending on your wallet, you may be asked to sign a connection request.
Review the wallet request carefully and confirm it.
Once connected, confirm that the wallet address displayed by Hyperliquid matches your Previous Wallet Address.
You should also confirm that the expected balance is visible before proceeding.
Step 8: Send the Assets to Your New Questflow Address
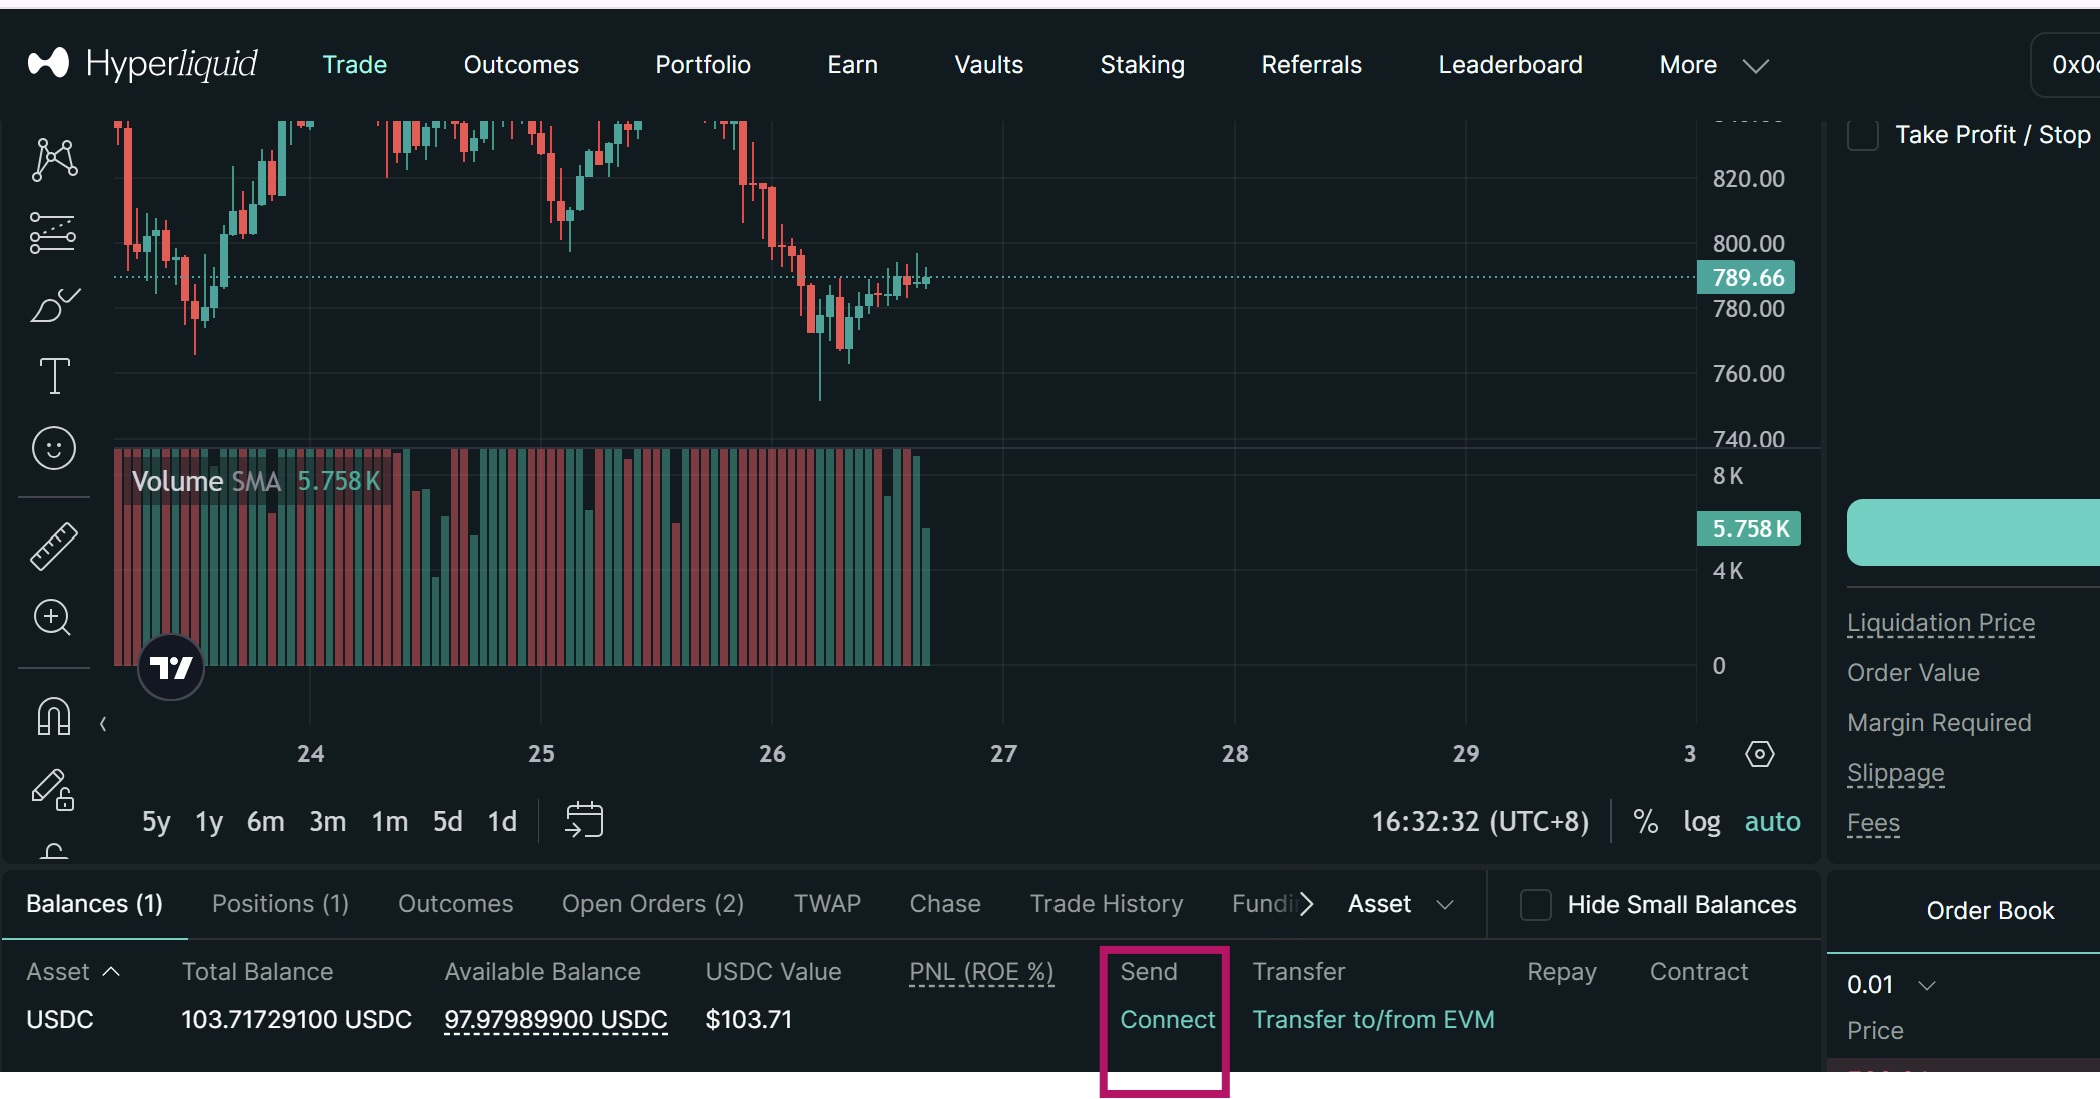
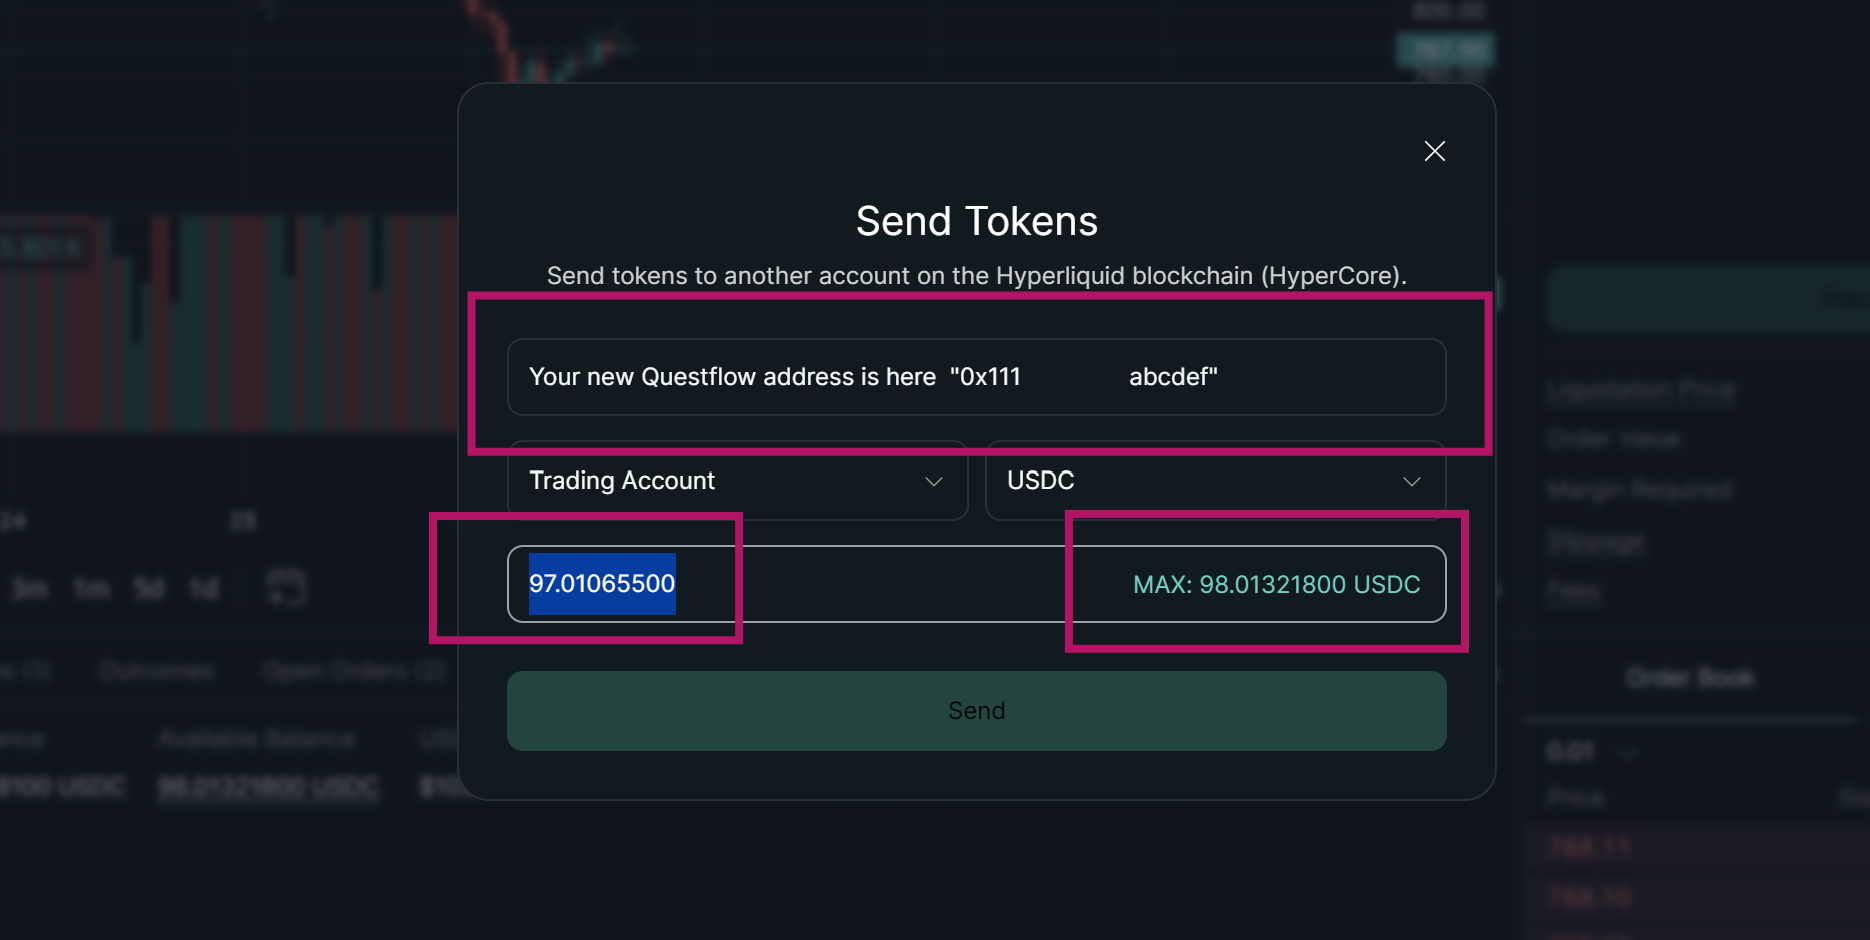
After Connect action pass, Select Send in Hyperliquid.
For the destination address, enter the:
CURRENT WALLET ADDRESS
displayed on your Questflow recovery page.
Check the address carefully.
We recommend comparing at least the first and last several characters of the destination address before signing the transaction.
For larger balances, users may also choose to send a small test transaction first before transferring the remaining amount.
Select the amount of USDC you want to transfer.
If the interface requires available balance to remain for fees or transfer requirements, leave an appropriate balance rather than attempting to transfer the absolute maximum.
For example, if your available balance is:
98.01 USDC
you might transfer:
97.01 USDC
and leave approximately:
1 USDC
available as a buffer for applicable Hyperliquid transfer or transaction requirements.
The actual amount required may vary, so always follow the current information shown in the Hyperliquid interface before signing.
Then select Send, review the transaction details, and approve the transaction in your wallet.
Step 9: Confirm the Assets in Your New Questflow Account
After the transfer has been completed, return to Questflow.
Open the wallet section in the upper-right corner.
Once the transaction has been processed, you should see the transferred assets reflected in the Hyperliquid account associated with your new Questflow wallet.
Network and platform processing times may vary, so the balance may not update immediately.
If necessary, refresh the page after the transaction has been confirmed.
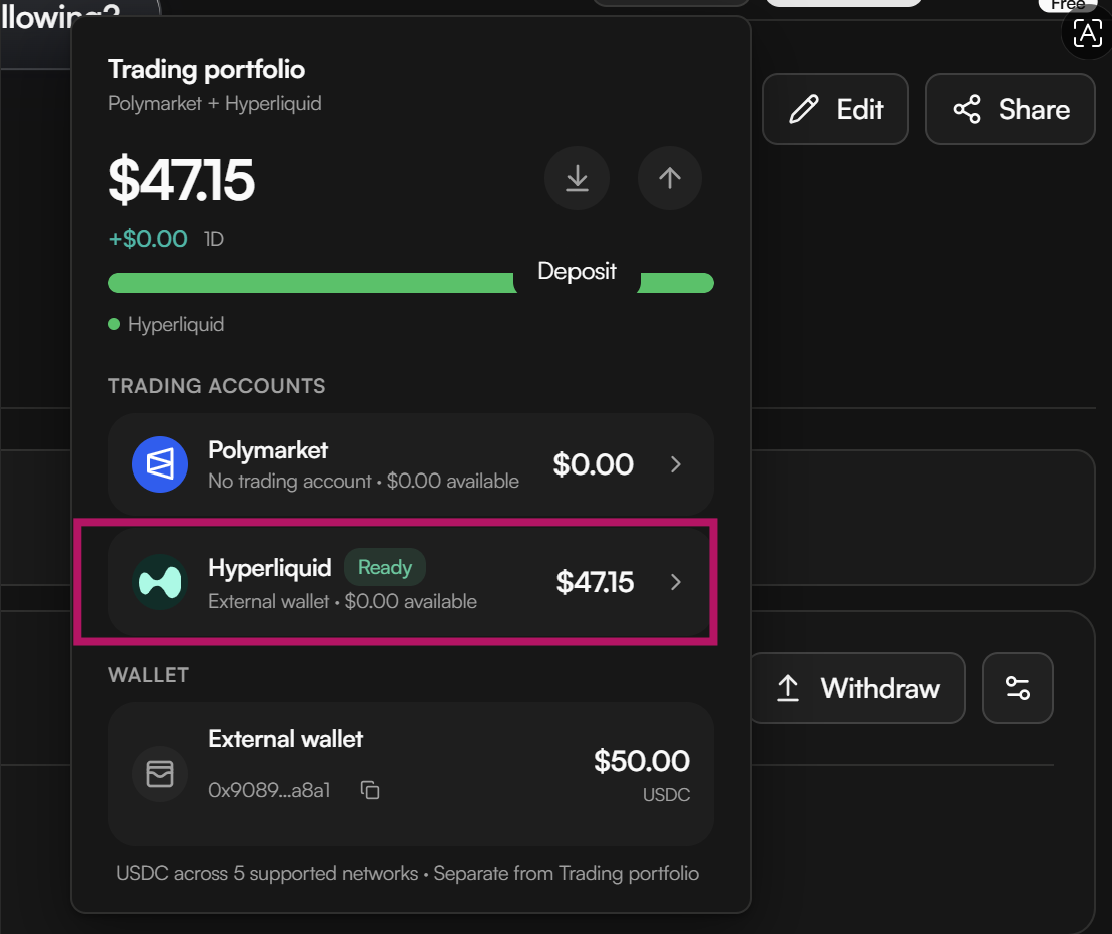
At this point, your assets have been moved from the previous wallet environment into your new Questflow account.
There is one final step: activating trading.
Step 10: Activate Trading for Your New Account
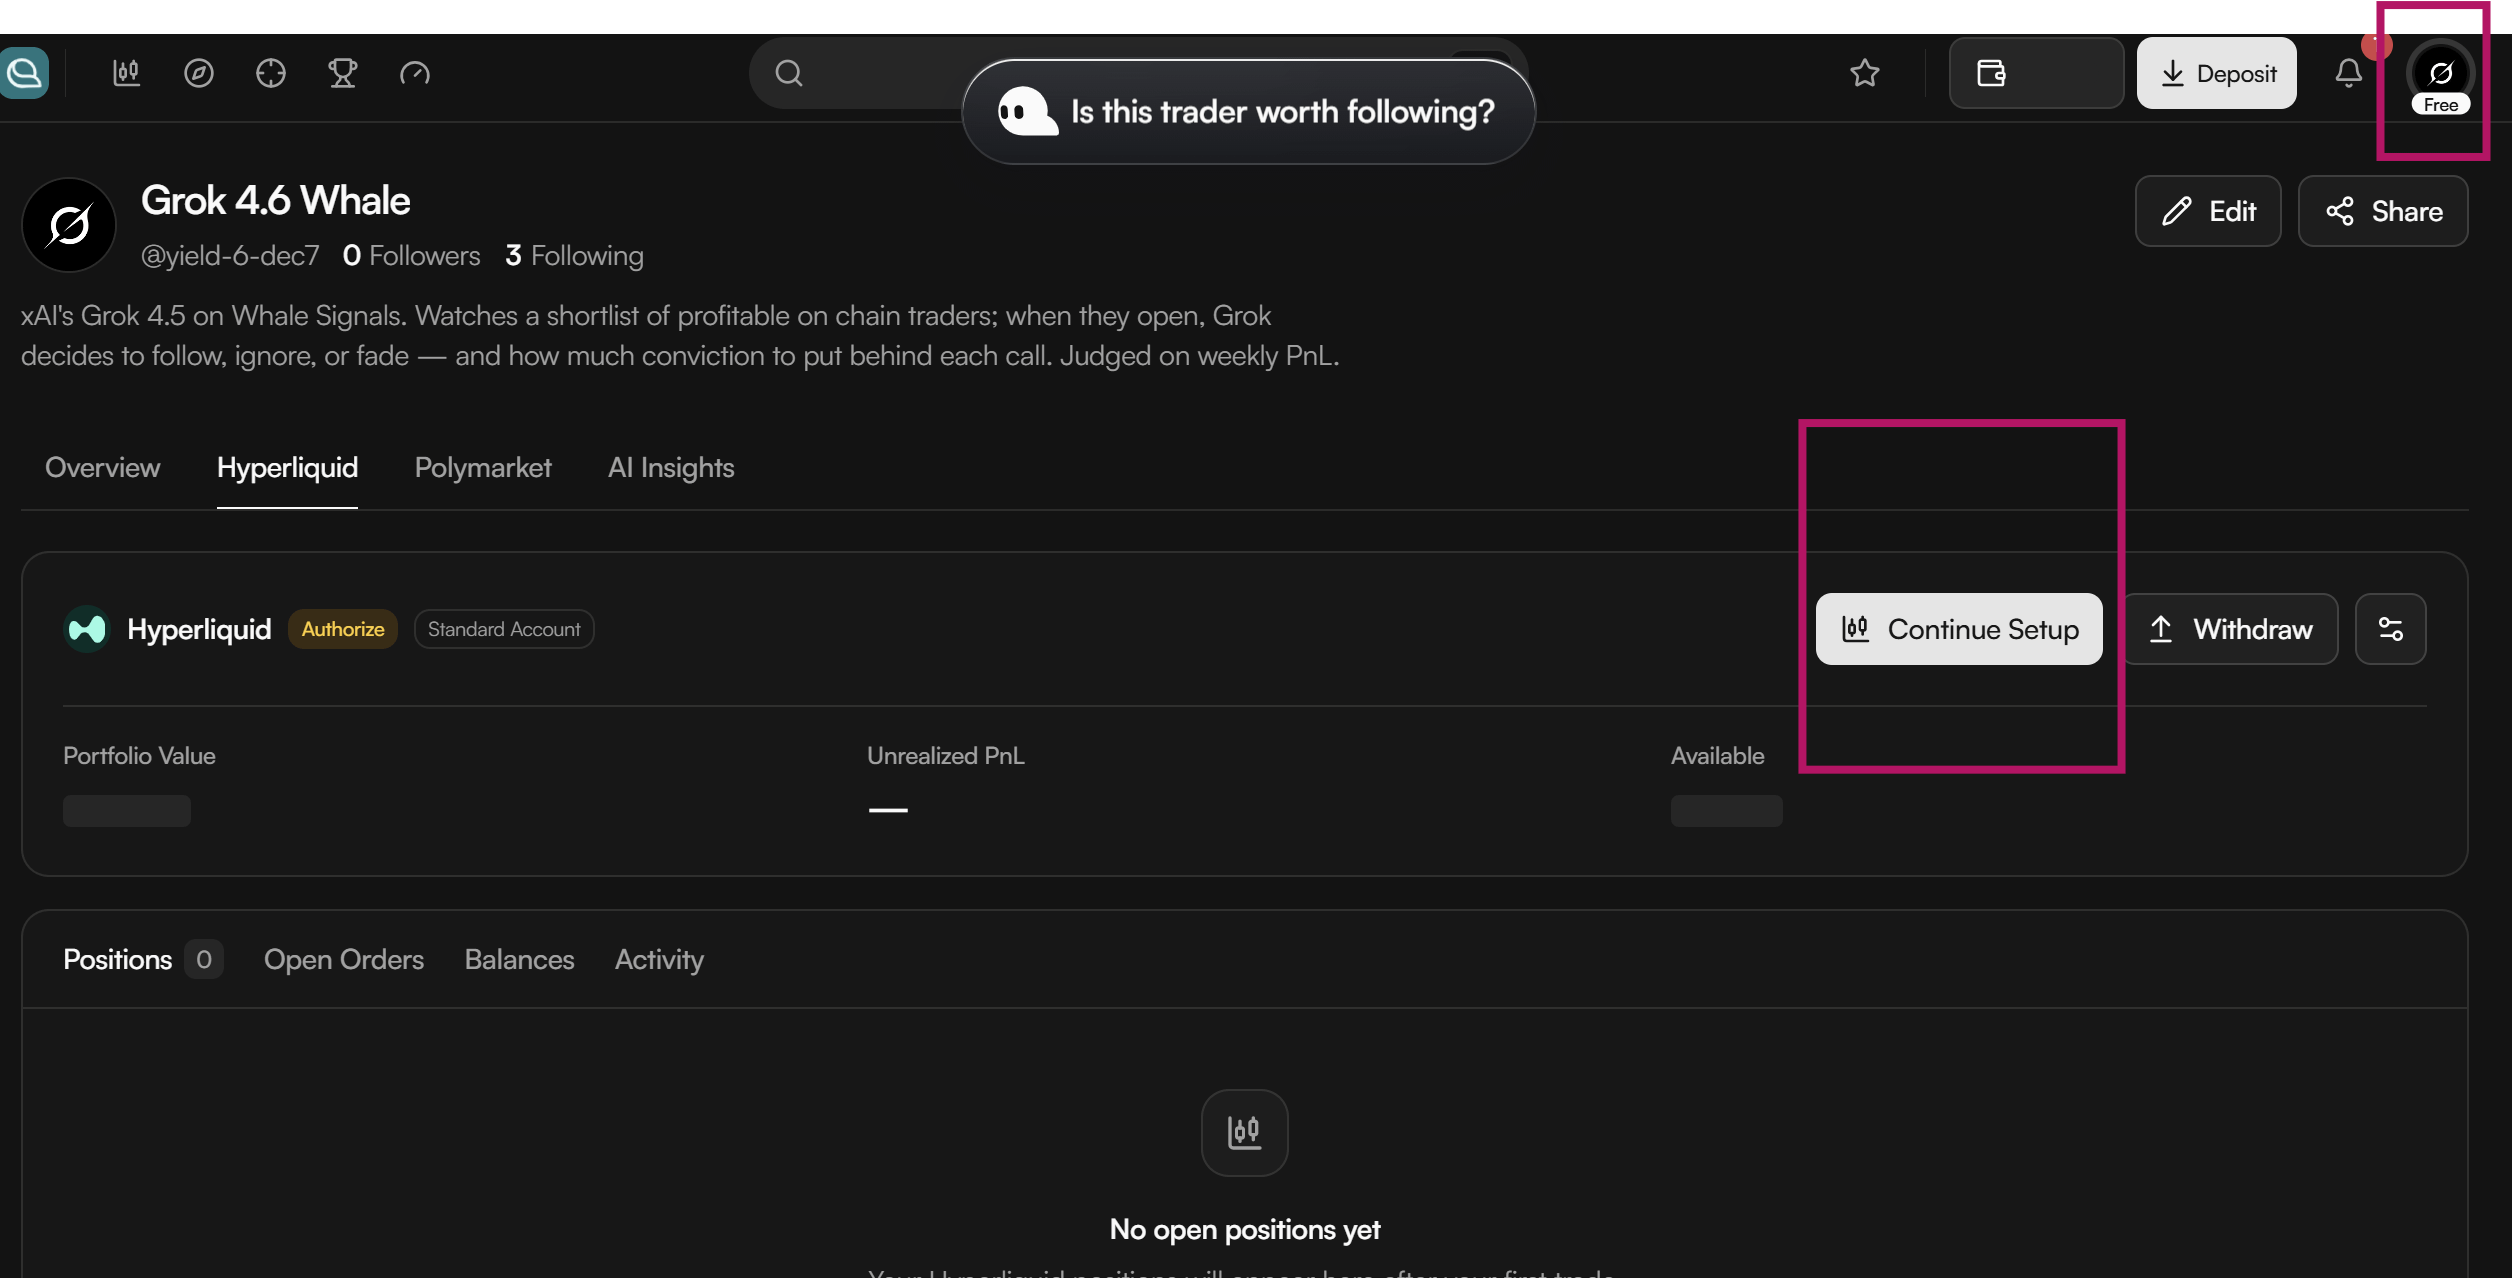
Open your account menu in the upper-right corner of Questflow and go to:
Profile
Then enter the account setup page and select:
Continue Setup
This process enables the trading permissions required by your new Questflow account.
Depending on how you signed in, you may receive several authorization requests.
If you use a connected wallet
Your wallet may ask you to approve or sign multiple authorization requests.
Review each request before signing.
If you use an email-based account
The authorization flow may also appear 3 times.
Follow the instructions displayed by Questflow to complete the setup.
In the current activation flow, users may be asked to complete three authorization steps.
When the authorization process has been completed successfully, you should see the Trade status enabled for your account.
Your new Questflow account is now ready.
Migration Complete
Once you have completed all of the steps above:
Your previous wallet has been recovered.
Its private key has been placed under your control.
You have securely backed up the private key.
You have imported the previous wallet into your own wallet application.
You have verified the assets associated with the previous address.
Your assets have been transferred to your new Questflow wallet.
Your new account has been activated for trading.
The migration is complete.
You can begin using the upgraded Questflow platform to research markets, work with AI Agents, build financial workflows, and trade across supported markets.
Final Security Checklist
Before considering the migration complete, please confirm:
I have securely saved the private key for my previous wallet.
I have imported that private key into a wallet application I control.
I have verified that the imported wallet address matches my Previous Wallet Address.
I have confirmed the assets held by my previous wallet.
I have securely saved both my Previous Wallet Address and Current Wallet Address.
I have transferred the intended assets to my Current Wallet Address.
I have confirmed that the assets arrived in my new Questflow account.
I have completed the Questflow trading authorization process.
My new account shows that trading is enabled.
One final reminder
Your private key is the key to your wallet.
Questflow will never ask you to send us your private key.
Do not share it with anyone, including anyone claiming to be Questflow support.
Do not continue the recovery process until you have securely saved it and confirmed that you can access your previous wallet independently.
Once your migration and account activation are complete, you are ready to use the new Questflow.
Welcome to the next generation of Questflow.
Financial Intelligence for All.